26 Easy & Practical RV/Camper Remodel Ideas You Can DIY This Weekend
Remodeling a camper doesn’t have to feel overwhelming. Whether you’re upgrading for practicality or adding a touch of style, there are countless ways to make your RV truly feel like home.
Let’s dive into creative, practical, and easy-to-implement ideas to revamp your camper, inspired by real-life designs.
Why Remodel Your Camper?
Here’s the thing: most RVs are built tough, but they aren’t exactly built to wow. Manufacturers use basic materials, default layouts, and colors that scream “generic.”
A remodel lets you give your camper a glow-up—style it to your taste, make it more functional, and add little touches that make it feel like home.
Here’s a bonus: a well-done remodel doesn’t just make road trips more enjoyable; it can actually boost the resale value of your camper.
My cousin upgraded her tiny kitchen area (think backsplash, new hardware, and better lighting) and sold her RV for way more than she expected. You never know—your work could pay off down the road!
Planning Your Remodel
Before you go full steam ahead, trust me on this: take time to plan. It might not sound fun, but having a roadmap makes the whole process way smoother (and saves you from head-smacking moments like running out of paint in the middle of nowhere).
1. Define Your Goals
Ask yourself: Why am I remodeling?Do you want a sleeker, modern vibe? Are you craving more storage for all those hiking boots and campfire essentials? Maybe you’re all about a cozy, rustic cabin look.
Whatever your vision, pin it down like a DIY pro. Once, I got lost in endless Pinterest boards and nearly forgot what I actually needed from my remodel—don’t be like past me!
2. Set a Budget (And Be Realistic!)
Ugh, the dreaded budget talk. But seriously, it’s so important. Divide your budget into categories—flooring, paint, appliances, tools, etc.—and leave plenty of wiggle room for the inevitable surprises.
(Yes, you will find something broken you didn’t even know existed. It’s an RV rite of passage.)
When I redid my camper, I budgeted for laminate flooring but fell in love with vinyl planks that cost just a smidge more.
Thankfully, I left room in my budget, so I could splurge—and it was worth every penny.
3. Gather Inspiration and Ideas
Get ready to become best friends with Pinterest, Instagram, and YouTube. If an idea or design sparks joy, pin it or screenshot it.
You’ll thank yourself later when you’re debating between curtain styles or cabinet colors. I saved about 20 Instagram posts of tiny van kitchens before finally nailing down a layout that felt right.
Don’t hold back—you can refine as you go.
26 Camper Remodel Ideas
1. Choose a Space-Saving Countertop
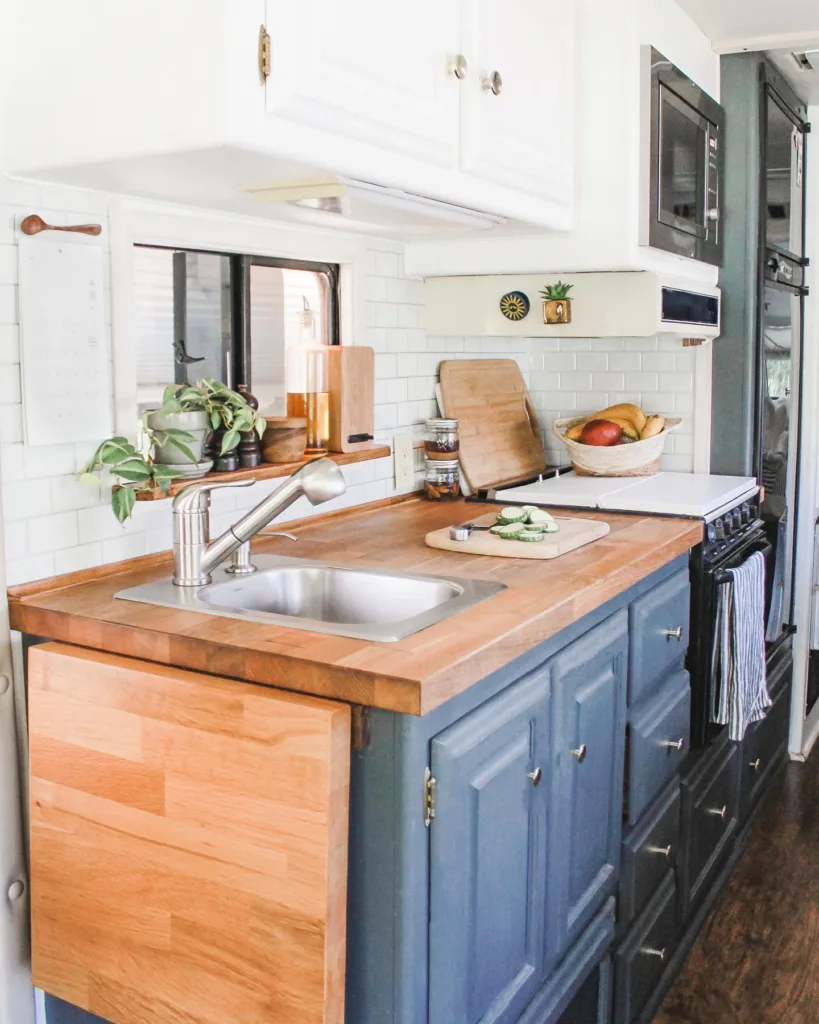 Source: @the_ramblr_rv / Instagram
A butcher block countertop is both stylish and practical, especially in a small space. I love the charm it brings to camper kitchens.
For a compact solution, use a folding extension to maximize prep space. It’s a game-changer if you have limited room.
Seal it to keep it durable and scratch-resistant. Add a potted herb or small plant for a fresh and lively touch.
Expert Tip: Use mineral oil or beeswax to keep wooden countertops looking new and prevent stains over time.
2. Swap Out Old Lighting Fixtures
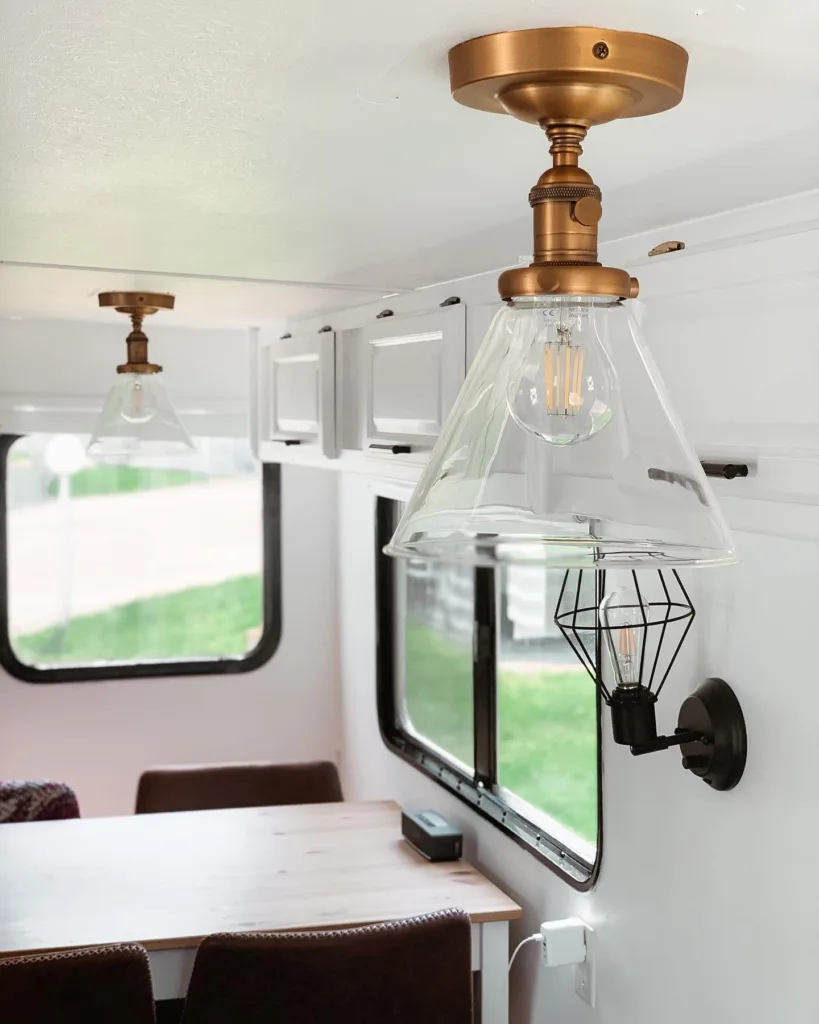 Source: @danielvanhorn / Instagram
Upgrading to modern light fixtures can transform your camper instantly. Pendant lights are great for creating a chic, open feel.
Use warm-toned LEDs for a cozy ambiance in the evenings. They’re energy-efficient too, so it’s a win-win.
Dimmers are always worth considering. I found mine perfect for adjusting light levels for reading, dining, or relaxing.
3. Add Simple Comforts for Your Pets
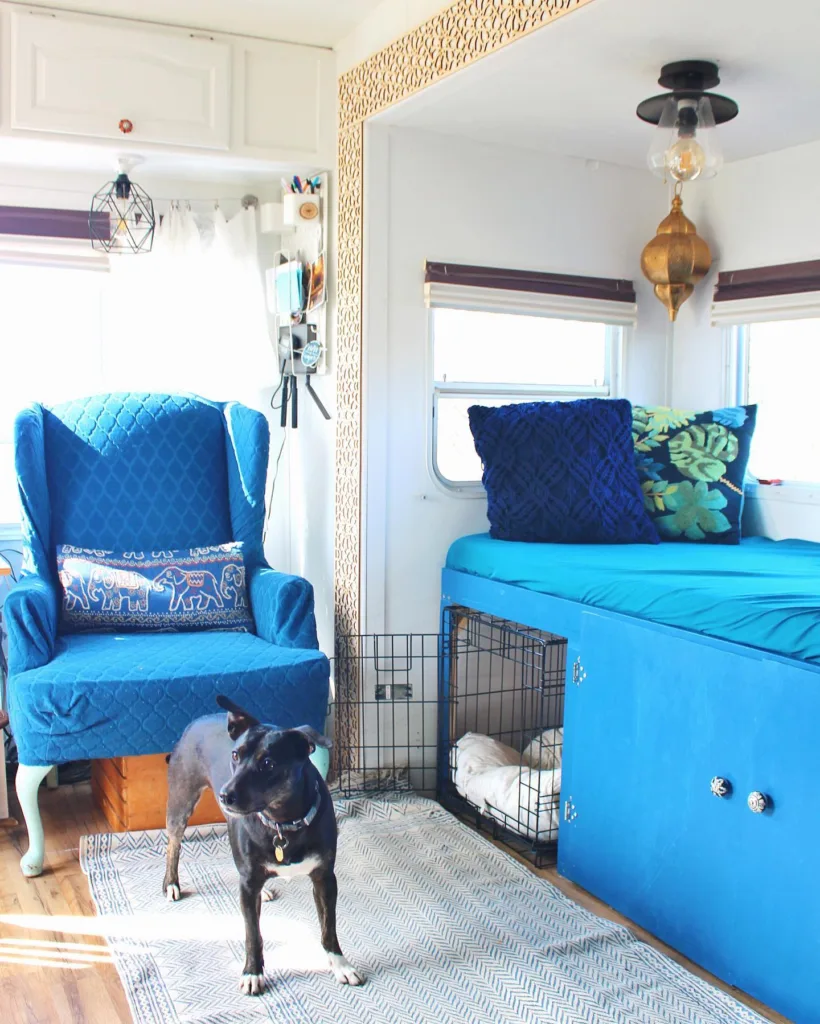 Source: @thetasteforadventure / Instagram
Your furry friend deserves a cozy nook! I love using under-seat storage for a discreet yet comfy pet zone.
Add a soft cushion to make it cozy and practical. Keep a few hooks nearby for leashes, collars, and bowls.
Blending the design with the rest of your camper’s interior is a great way to maintain a cohesive look.
4. Use Wooden Details for Warmth
 Source: @the.dreaming.road / Instagram
Wood accents can bring warmth to your camper instantly. A paneled ceiling is a great starting point—it’s rustic and cozy.
A good stain can enhance the grain and color, making the space feel more grounded and natural.
Try small wood elements like trims or shelves as subtle, affordable upgrades that make a big style impact.
Expert Tip: Use lightweight, reclaimed wood for accents to avoid adding too much weight to your RV.
5. Pick a Bold Kitchen Backsplash
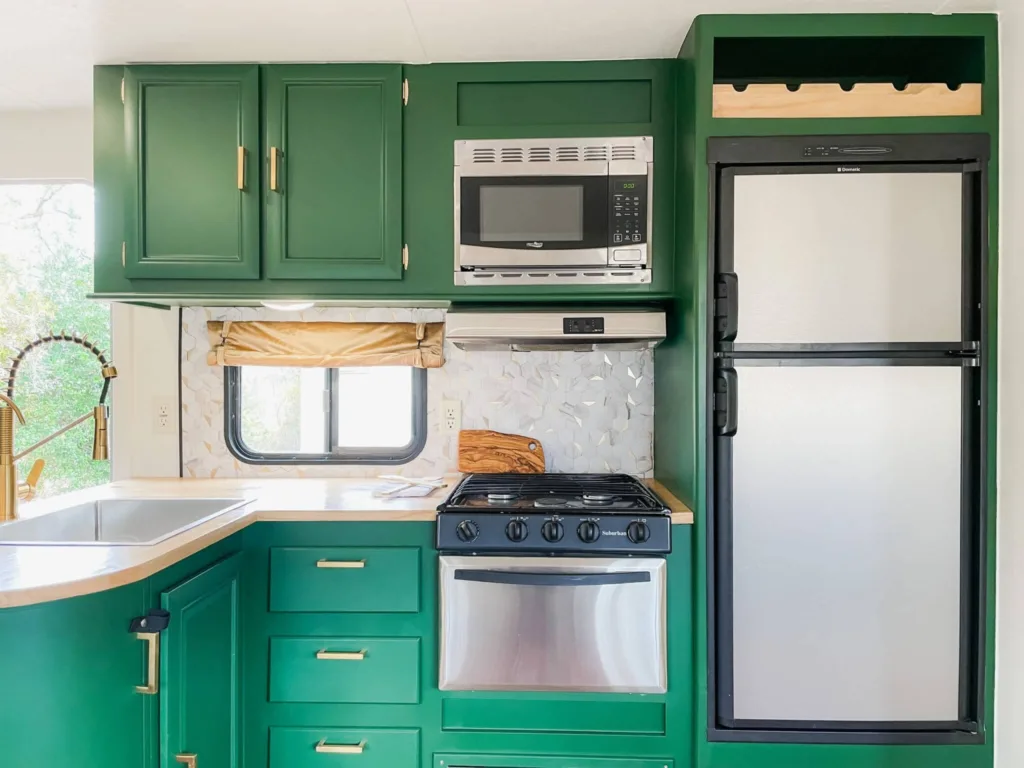 Source: realitydaydream.com
A bright backsplash can turn your kitchen into a focal point. Peel-and-stick tiles make this project both quick and affordable.
Choose patterns or colors you love, like the bold mosaic ones here. They bring personality without overwhelming the space.
Match your backsplash with cabinet shades or countertops for a clean, cohesive appearance.
Expert Tip: Use a clear sealant over stick-on tiles in moisture-prone areas like near the sink for extra durability.
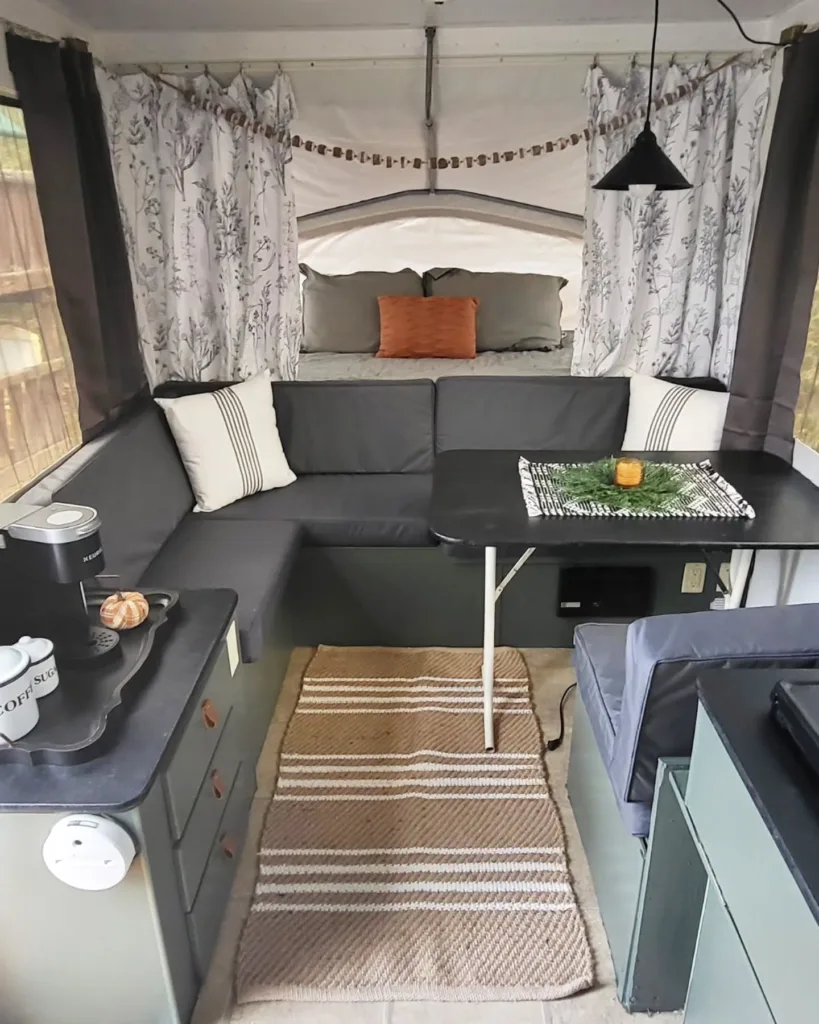
6. Go Boho for a Relaxing Pop-Up Style
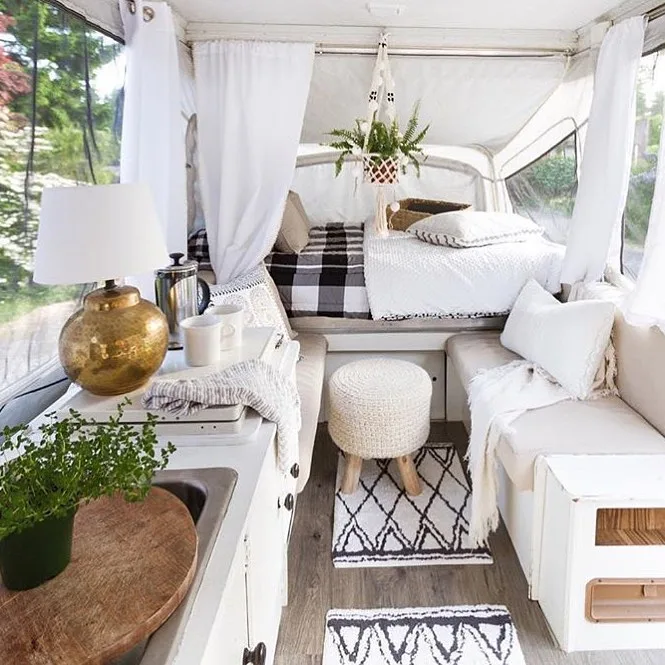 Source: @rosabeltrandesign / Instagram
To nail that boho vibe, focus on neutral tones, layered textures, and natural materials like rattan or macramé.
Floating baskets or hanging planters are perfect for saving floor space while adding life to the interior.
I use cozy throws and patterned pillows to evoke a relaxed, inviting feeling every time we’re on the road.
7. Bring in Natural Light with a Skylight
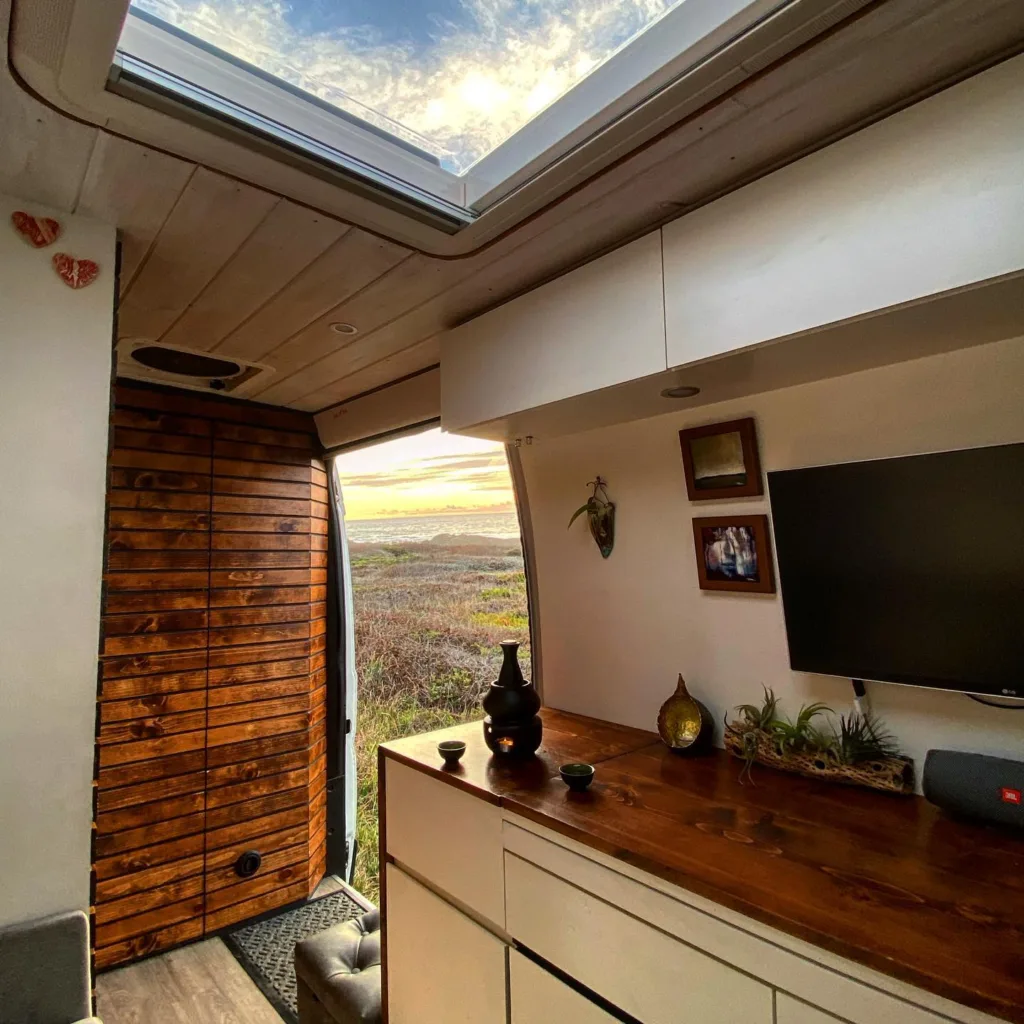 Source: @the_tennis_promaster / Instagram
A skylight does wonders for small spaces—it’s like giving your camper a breath of fresh air.
It can brighten your mornings and make rainy days feel so much cozier. I absolutely loved the change when I added one.
Remember to properly seal the installation to avoid leaks. Tinted options are great for summer trips when the sun is extra strong.
Expert Tip: Install blinds or a retractable shade for controlling glare and heat on sunny days.
8. Invest in Versatile Camper Furniture
 Source: @plumprettydecoranddesign / Instagram
Custom-built benches with hidden storage are a fantastic way to maximize your camper’s function.
Add neutral cushions with easy-to-clean covers to balance practicality with comfort. It’s a small touch that pays off.
Fold-out tables are another great addition—they save space and adapt easily to dining, working, or just relaxing.
9. Use Patterns to Add Personality
 Source: @thepopupprincess
Fabrics with bold patterns can give your RV a big personality boost. Geometric designs are my personal go-to.
Pair busier fabrics with neutral tones to avoid overwhelming the space. This tip keeps everything balanced visually.
Using removable cushion covers or swappable curtains makes it easy to refresh your décor whenever you’re in the mood for a change.
Expert Tip: Pick fabrics that are UV-resistant to prevent fading from prolonged exposure to sunlight.
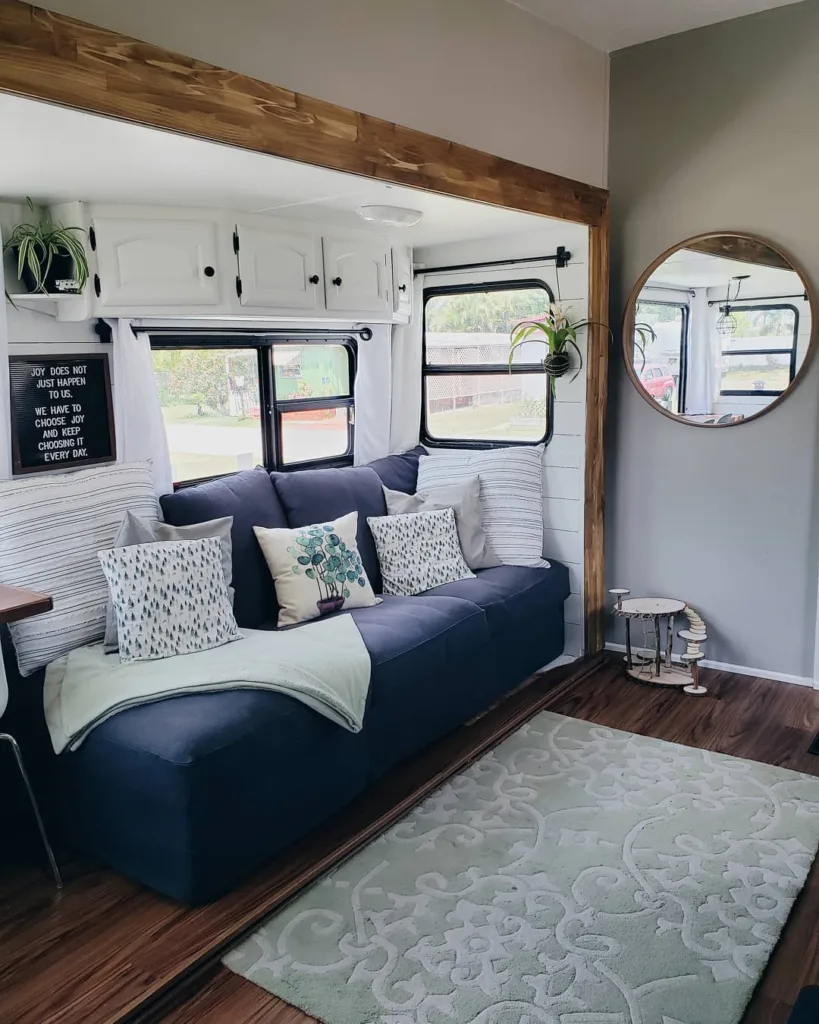
10. Combine Dark and Light Textures
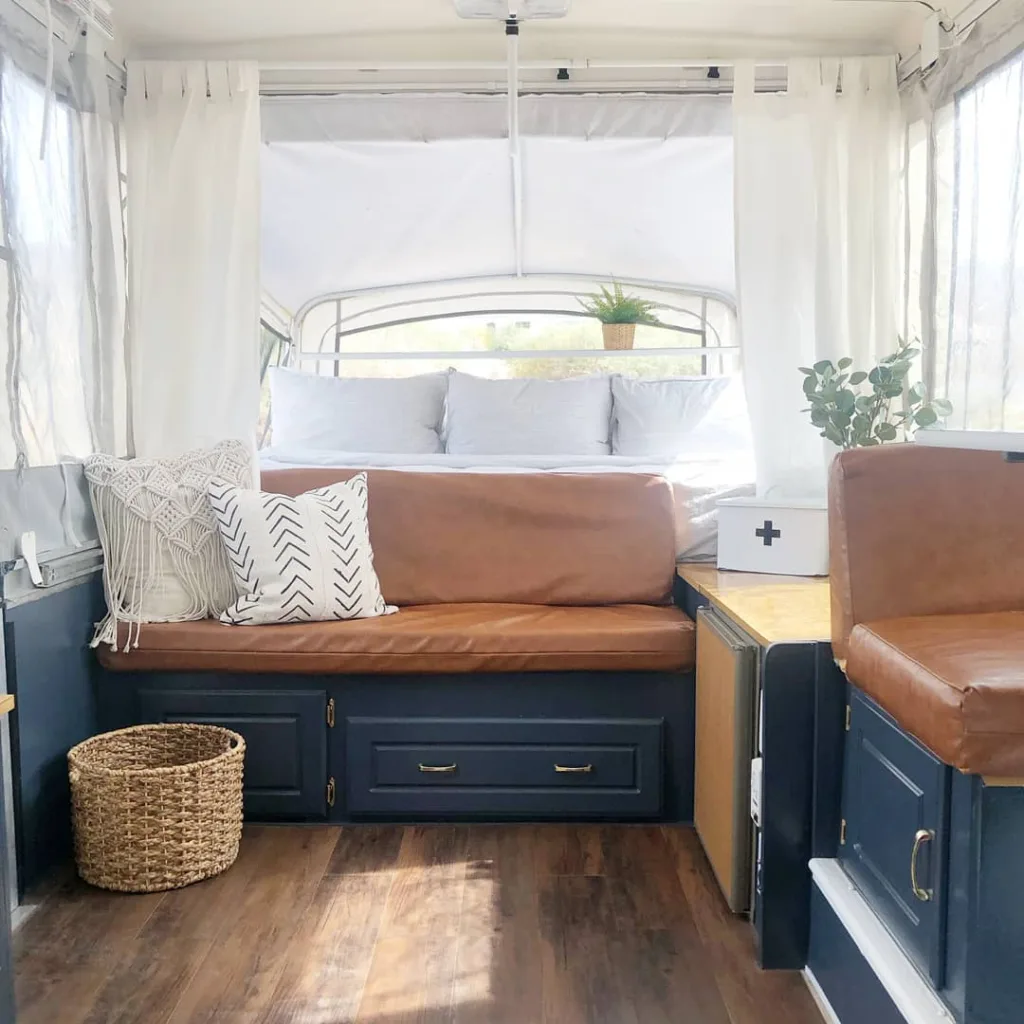 Source: @thepopupprincess / Instagram
Navy blue paired with leather creates a sophisticated look without cramping the space. It’s a combo I love for any RV setup.
Brighten up with lighter flooring or accents. I find adding off-white throws or cushions keeps things balanced.
Leather is super RV-friendly—it’s durable, easy to clean, and stylish. Wipes clean like a dream after messy road trips!
11. Pick a Compact Bathroom Vanity
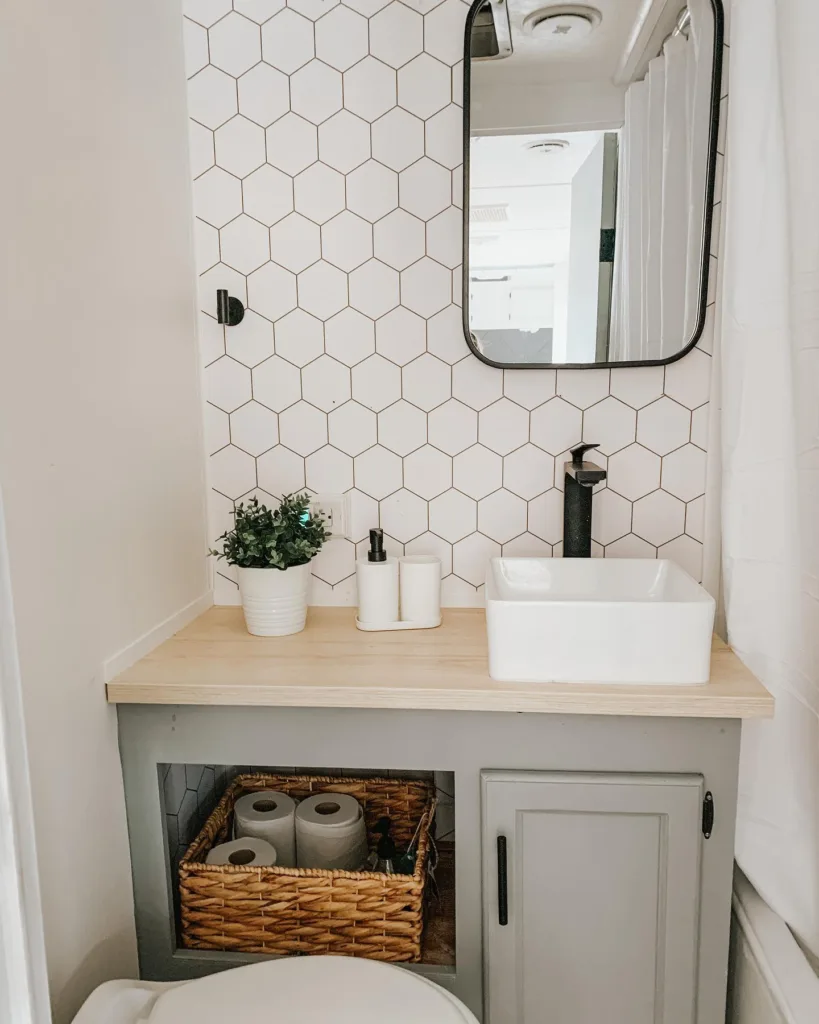 Source: @olsonhousehome / Instagram
A floating vanity makes your bathroom feel bigger without sacrificing storage space. I went this route and never looked back.
Compact sinks are perfect for campers. Keep things airy and sleek by using open shelves for neat towel storage.
To add charm, place a little plant or a stylish soap dispenser for personal touches. They make a small bathroom feel high-end.
Expert Tip: Choose durable, waterproof materials to extend the lifecycle of your bathroom upgrades.
12. Make Your Camper Kid-Friendly
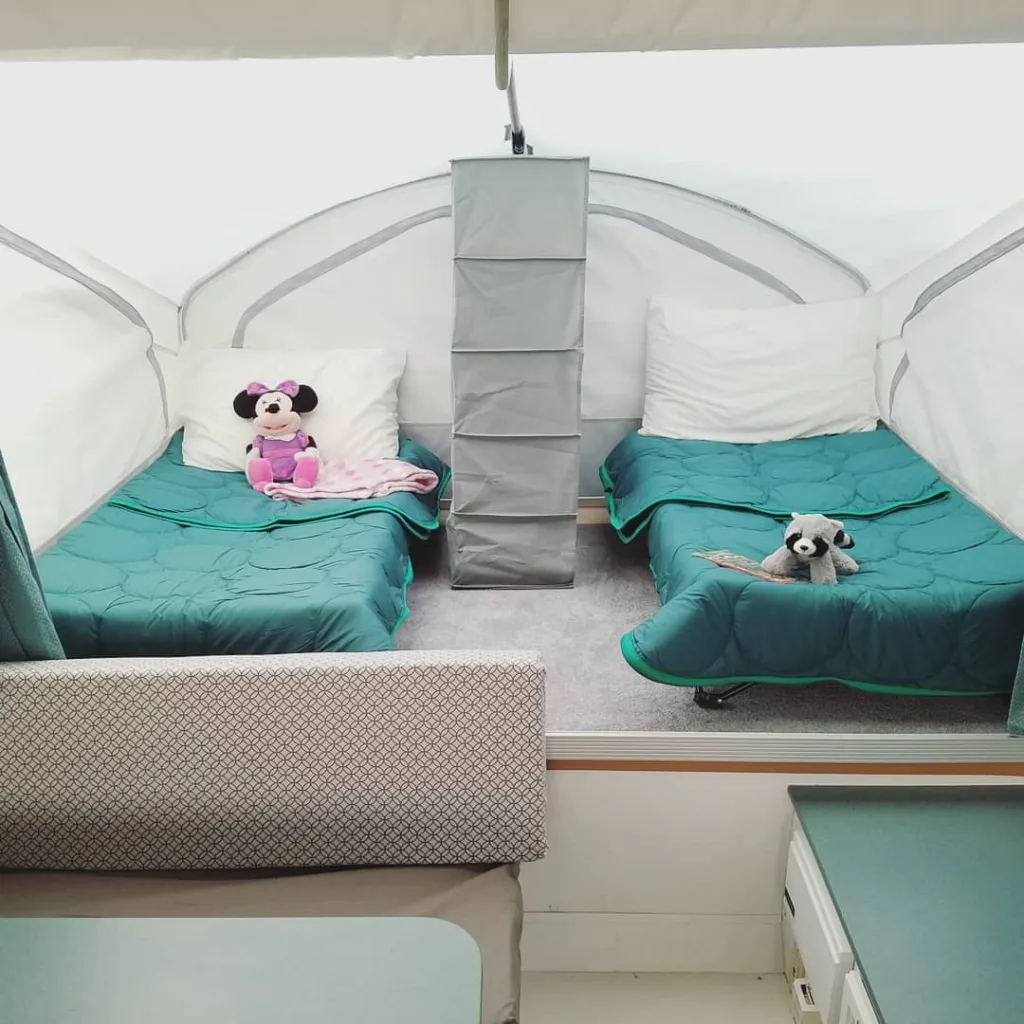 Source: @exploringdomesticity / Instagram
Creating a kid-friendly space is all about balance. Bins for toys and collapsible storage boxes are lifesavers for staying organized.
Adding fun bedding designs or cartoon-themed throws helped my kids love their bunk area. It’s a big hit during trips.
I also use hanging organizers for easy-to-reach essentials. Kids love them, and they keep clutter from spreading across the camper.
Expert Tip: Keep indoor/outdoor washable mats near entryways since kids bring in plenty of dirt after playtime!
13. Add Shower Shelves for Practical Storage
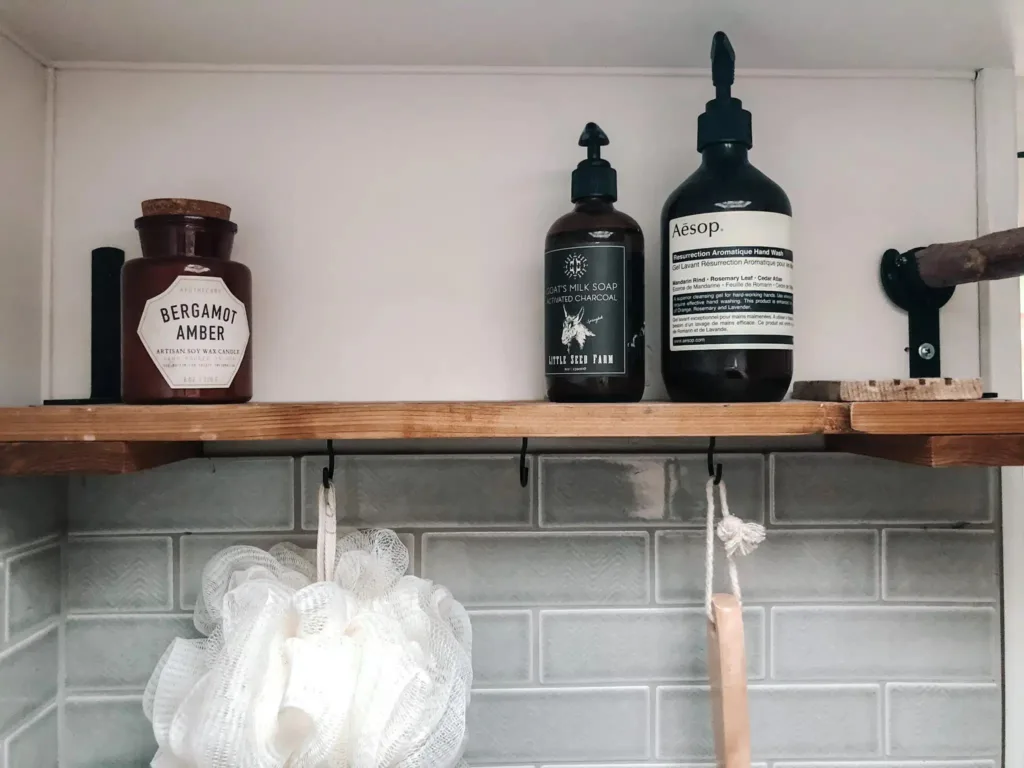 Source: Dina Krukovets
Installing compact shower shelves can really keep your RV bathroom neat. I love adhesive-mounted ones as they avoid wall damage.
Wooden shelves are fantastic—they’re lightweight, water-resistant when treated, and add warmth to the space.
Keep the shelves minimal, focusing only on key items like soaps, haircare, or loofahs. Compact storage works wonders here.
14. Create a Dedicated Workspace
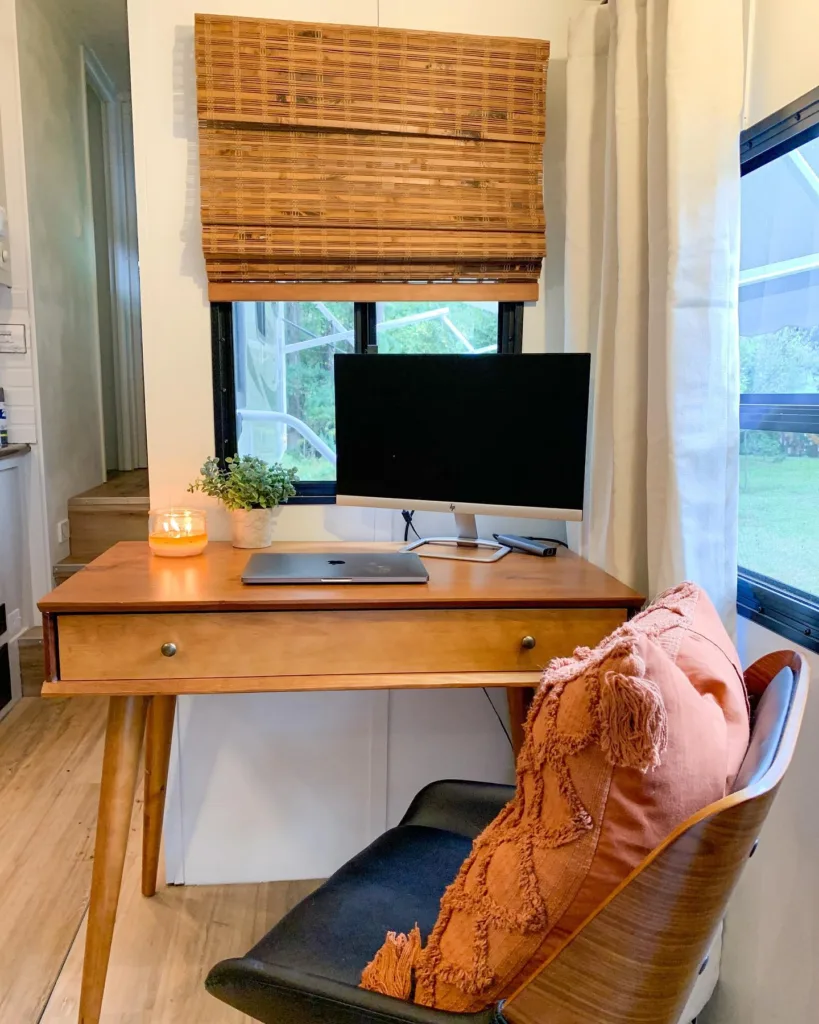 Source: @aluraroe / Instagram
A small desk under a window can become the perfect camper workspace. I built one with a wall shelf above—it’s a game-changer for storage.
Add personal touches like a candle, planner, or small desk lamp to make it feel like your spot. It’s the little things that matter.
Fold-out desks work well if space is tight. I’ve used one before, and it freed up the area beautifully after work hours.
Expert Tip: In tight spaces, use wall-mounted power strips to declutter charging cables while working.
15. Keep It Bright with Light Tones
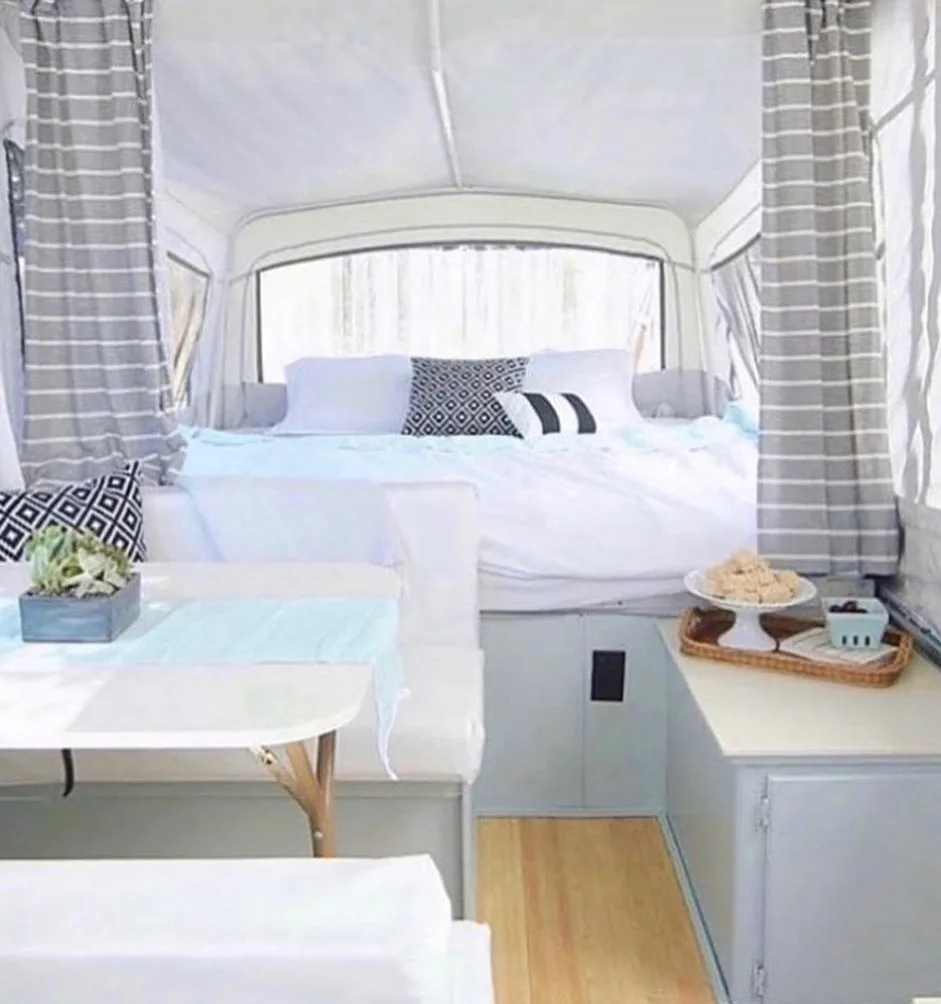 Source: @rice_camp / Instagram
For an airy pop-up camper, soft grays and whites keep things feeling fresh and open. I always turn to neutrals for spaces like these.
Washable fabrics are life-savers on the road, especially for cushion covers and curtains. Easy to maintain = less stress.
Break up the monotony with subtle patterns to add depth. Striped pillows or textured curtains are simple ways to jazz it up!
Expert Tip: Use reflective surfaces (like mirrors or metallic accents) to enhance the light and make spaces feel bigger.
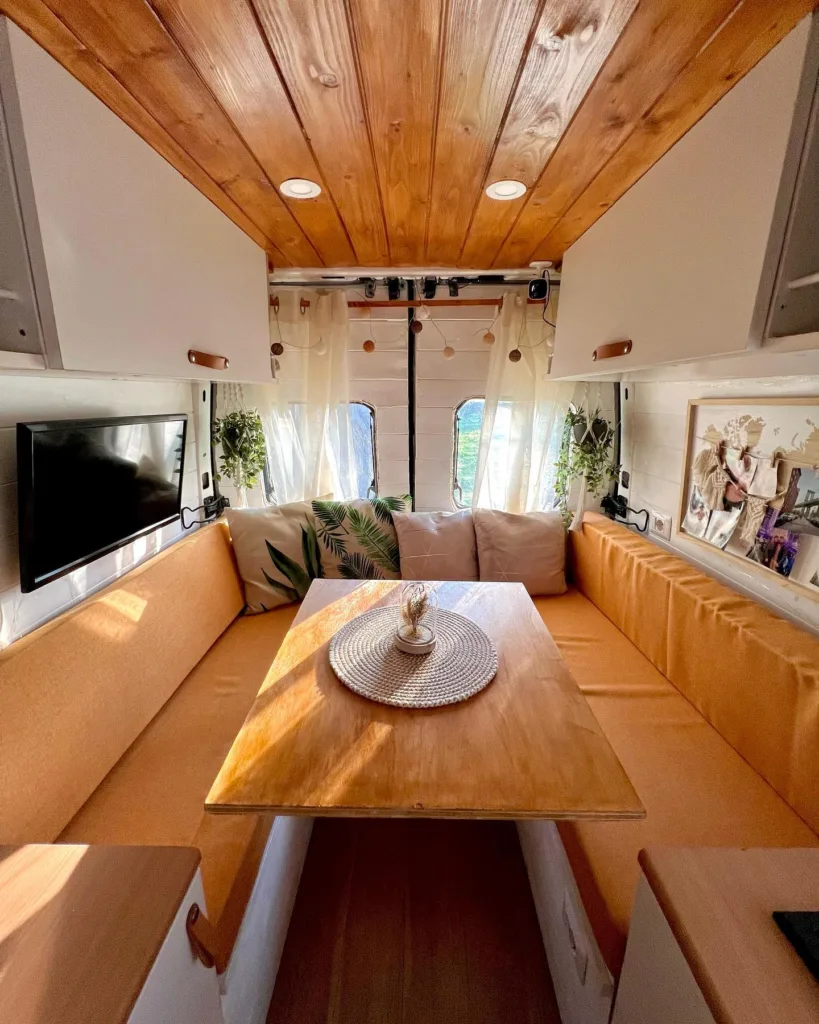
16. Add Comfort Where You Dine
 Source: Meggy Lohr
Soft seating and a round wooden table make this dining nook stand out. It’s cozy for meals and doubles as a lounging spot with plush cushions.
Use neutral tones like white or beige to keep the area feeling open. Wooden accents add warmth and charm.
Top things off with a plant or a small centerpiece to bring in an inviting, homey vibe that’s both simple and functional.
Expert Tip: Use washable or wipeable fabrics for the cushions. They’ll stand up better to frequent use and spills on the road.
17. Give Your Pets Their Own Nook
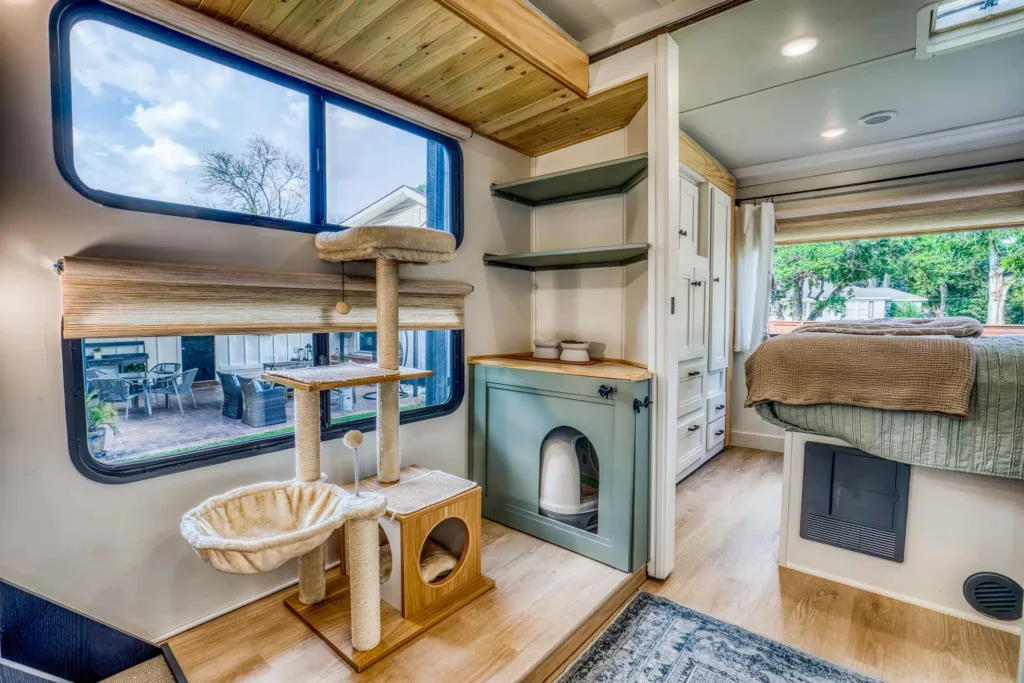 Source: danniellejoy
If you’re traveling with pets, why not dedicate a little space just for them? A climbing corner and feeding station work great here.
Keep it near a window so your furry friend can bask in sunlight while staying cozy. They’ll love the view!
You can also repurpose furniture creatively—integrating their space into existing storage can maximize your camper’s layout.
18. Brighten Up With Retro Colors
 Source: @ericarossmn / Instagram
Bold greens, rust tones, and funky patterns make this retro vibe hard to resist. It’s exciting without looking busy!
Find vintage-inspired decor or shop thrift stores to tie your look together with charming, one-of-a-kind finds.
Mixing textures like patterned rugs and cozy fabrics can amp up the retro energy while keeping it fun and creative.
Expert Tip: Apply peel-and-stick vinyl decals on cabinets or countertops for easy, removable bursts of retro flair.
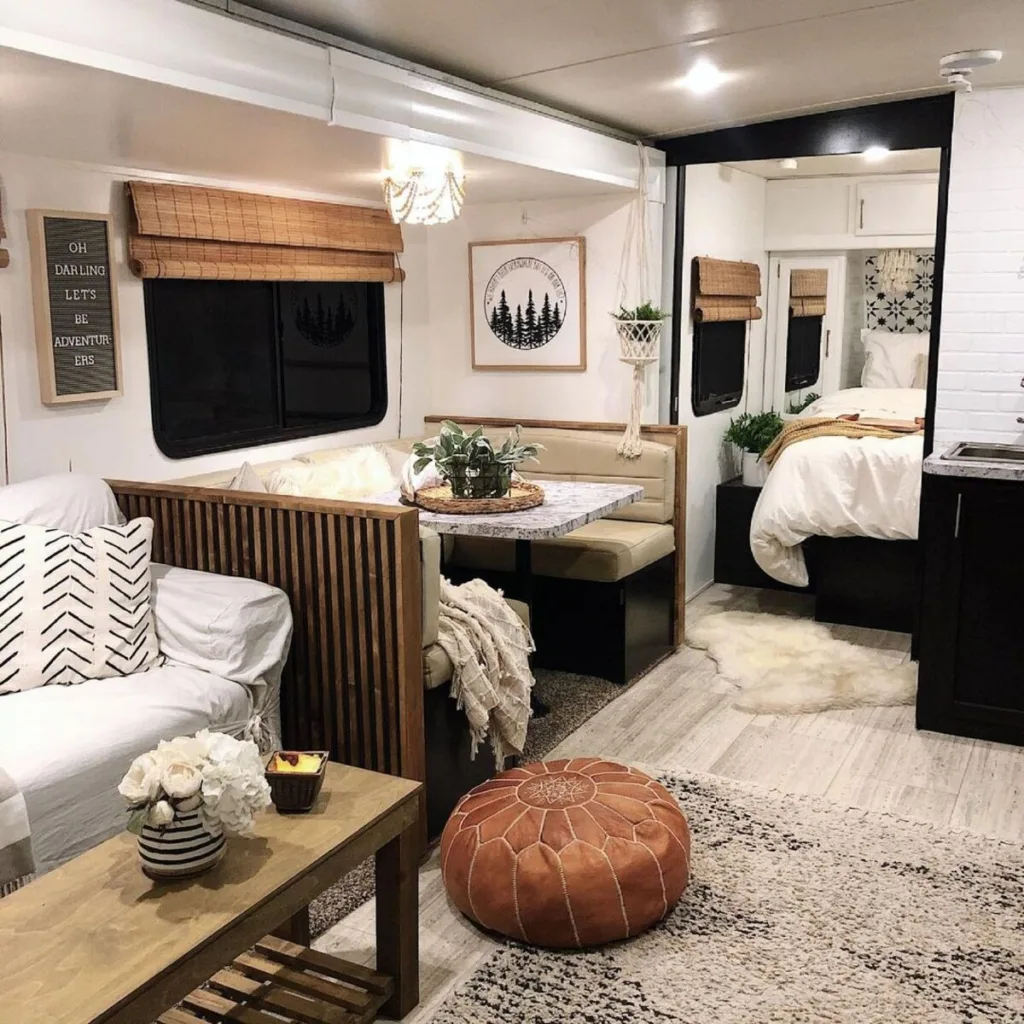
19. Create Flow by Uniting Spaces
 Source: @vanlife.traveling
Open spaces that smoothly connect your kitchen, dining, and lounge areas feel less cramped and cozier.
Stick to a consistent color scheme or use wood accents to keep the areas visually connected.
For evenings, add soft lighting in all zones—it defines each part of the camper while maintaining the flow.
20. Refresh Your Interiors With Paint
 Source: @rooted.in.strength / Instagram
Light-colored paint like white or off-white instantly makes compact spaces feel larger and brighter.
Accent walls or cabinetry painted in muted tones like dusty blue keep it fresh but inviting.
Try using leftover paint for quick updates on shelves or trims. Durable paint is a must for these functional, high-traffic areas!
Expert Tip: Choose semi-gloss or satin finishes for durability and easy cleaning in tight camper spaces.
21. Use Wallpaper to Add Personality
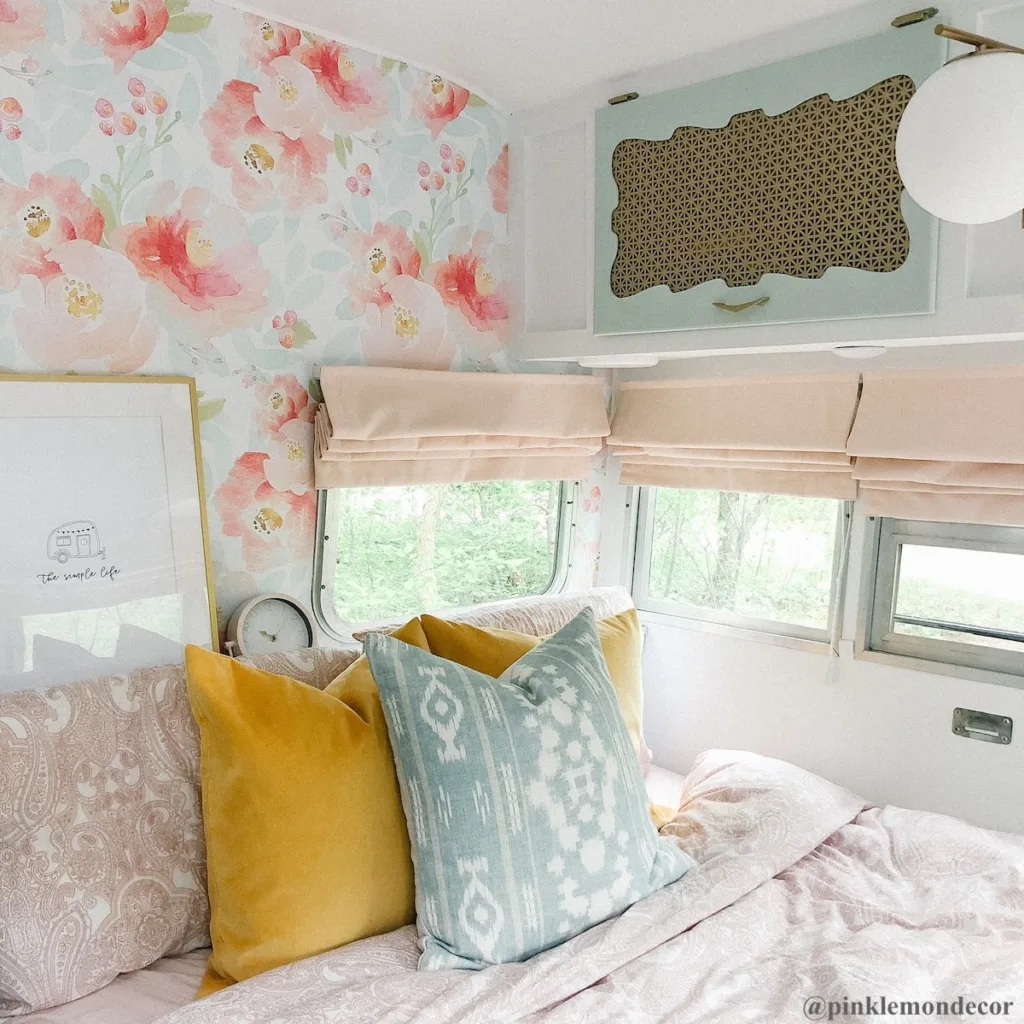 Source: @pinklemondecor / Instagram
Peel-and-stick wallpaper is your best friend for transforming small spaces quickly. Start with one feature wall.
Soft patterns like florals create warmth and visual interest without overpowering the room.
Look for removable options—they’re perfect for experimenting and can be swapped out without a hassle if you change your mind.
Expert Tip: Use wallpaper scraps to cover drawer fronts or table tops for a matching, cohesive design.
22. Go Rustic With Farmhouse Style
 Source: @diyrestoreandmore / Instagram
Muted grays and crisp white tones create a clean yet cozy farmhouse vibe. Add wood features like paneling for warmth.
Layer in woven rugs, throw blankets, or patterned pillows to add texture—you’ll love how it pulls everything together.
Even in a small camper, this style feels comfy, inviting, and works beautifully with rustic decor.
Expert Tip: Add shiplap accents or faux barn doors to amplify the farmhouse charm without overwhelming the space.
23. Choose Neutrals for an Airy Feel
 Source: @housemadelovely
Neutral tones like whites, beiges, and light grays are great for making tight spaces feel bright and open.
Keep furniture designs simple and sleek to avoid overloading the look. For pops of color, add a few green plants.
This palette is easy on the eyes, making it ideal for creating a relaxing atmosphere on the road.
24. Use Black and White for Timeless Style
 Source: @rvinspiration
A crisp black-and-white color scheme is perfect for a clean, modern look. Pairing dark furniture with white walls feels effortless.
Break up the boldness with cozy textures like patterned rugs or throw blankets to make the area softer and warmer.
Adding wood or greenery brings balance to the monochrome design while keeping it visually stunning.
25. Make Your Camper Feel Larger With Open Concepts
 Source: @gabypopovici
Opening up dividers between spaces instantly makes your camper feel more spacious and inviting.
Multifunctional furniture like ottomans or wall-mounted tables keeps the setup versatile while staying organized.
Use rugs or lighting to gently distinguish the zones within your open floor layout—it’s practical and stylish!
Expert Tip: Maximize vertical storage with floating shelves to keep items off the floor and maintain open space.
26. Design a Space That Everyone Can Enjoy
 Source: @mountainmodernlife
A comfy family setup includes throw blankets, pillows, and flexible furniture pieces for everyone.
Ensure storage is accessible but neatly tucked away, leaving room to relax without clutter.
Little details like soft lighting or a dedicated kids’ corner can make everyone feel right at home on every trip.
FAQs: Practical Tips and Advice from Experience
Remodeling a camper is such an exciting adventure! I mean, who doesn’t love the idea of transforming a cozy little home on wheels into the perfect retreat?
Whether you’re on a tight budget or dreaming of a camper oasis, I’ve answered some of the most common questions from my own personal experiences (and a bit of trial and error!). Let’s get into it:
1. How much does it cost to remodel a camper?
Ah, the million-dollar question (or more like the “several hundred to few thousand-dollar” question). If you’re just looking at simple upgrades like painting cabinets or replacing hardware, you can start around $500.
When I did my first remodel, I spent about $1,000 just by focusing on painting, flooring, and updating a few light fixtures.
If you’re going all in—down to demoing, rewiring, and custom furniture—be prepared to spend $2,000 to $10,000, depending on how fancy you want to go.
2. Can I remodel my camper by myself?
Absolutely! If I could figure it out, anyone can. With a few basic tools, some patience, and YouTube tutorials, you’d be amazed at what you can pull off. Start small—replace your camper cushions or repaint the walls—and build confidence from there.
When I finally worked up the nerve to swap out the flooring, I went with vinyl planks because they’re lightweight, durable, and (thank goodness) super forgiving.
If you ever get stuck, online forums or Reddit communities like r/VanLife are lifesavers. Trust me, everyone in this space is rooting for you.
3. What are the best materials for camper walls?
Here’s where I learned the hard way—choose lightweight materials! Heavy stuff will literally weigh down your camper (and hello, extra fuel costs).
I’ve had the best luck with lightweight plywood and beadboard panels. They’re sturdy, look amazing with a coat of paint, and don’t break the bank.
Peel-and-stick wallpaper is another game-changer if you’re looking for something fun and easy without committing to paint.
I used it in my camper’s bathroom to add a pop of color, and it’s holding up fantastic even with all the humidity!
4. How do I avoid mold in a camper bathroom?
Oh, mold… the eternal camper nemesis. The trick is ventilation—lots and lots of ventilation. If your camper doesn’t already have one, install a fan in the bathroom ASAP.
After every shower, I open the windows, turn the fan on, and wipe down the walls quickly. Moisture-absorbing products like DampRid are also a lifesaver in those tighter spaces.
I made the mistake of not sealing around the sink properly after upgrading it, and, yep, I had to re-do the entire countertop.
Lesson learned: seal everything twice. Water will find its way into even the tiniest crevices.
5. Is it safe to change the camper’s layout?
Short answer: yes, but proceed with caution. I rearranged the dining area in my camper to create more living space, and it made a world of difference.
That said, don’t remove anything without double-checking its importance. Some things, like load-bearing walls or major plumbing and electrical lines, shouldn’t be tampered with unless you’re 100% sure it’s safe.
Before ripping anything out, do some research on your specific camper model.
I found detailed diagrams for mine online that helped me figure out what was safe to move or remove. When in doubt, ask a professional to look over your plans.