18 Proven IKEA Hacks That Will Save You a Ton of Time in Your Craft Room
Calling all crafters! Are you tired of juggling supplies on a messy table or struggling to find space for your ever-growing stash of materials? You’re not alone—craft rooms can easily turn from inspiring to chaotic in no time.
Imagine having a perfectly organized craft room where every ribbon, fabric, and tool has its place. Sounds dreamy, right? The good news is, you don’t need to spend a fortune to make it a reality.
IKEA, the ultimate destination for affordable and stylish home solutions, has everything you need to take your craft space from cluttered to Pinterest-worthy.
Whether you’re a seasoned DIY pro or just starting your creative journey, we’ve rounded up 18 genius IKEA products that can transform your craft room.
From multifunctional storage to space-saving desks, these picks are practical, budget-friendly, and designed to make your creative process smoother and more enjoyable.
Ready to turn your dream craft room into reality? Keep reading to discover our must-have IKEA recommendations that’ll spark joy—and endless creativity!
Why IKEA is a Crafter’s Best Friend
IKEA just gets crafters. Their products are customizable, durable, stylish (hello, aesthetics), and don’t cost a fortune—basically everything a creative person dreams of. Whether your craft is knitting, painting, scrapbooking, or running an Etsy shop, IKEA turns chaos into organized bliss.
From pegboards to rolling carts to shelves that double as home decor, the possibilities are endless! Here’s how to make the most of IKEA magic in your craft room.
How to Choose IKEA Products for Your Craft Space
1. Know Your Crafting Style
Every craft has its unique chaos. Fabric lovers? Think open shelving for folded fabric or bins for scraps. Scrapbookers and jewelry makers? Tiny compartments are your best friend. Got brushes, paints, or tools? Look for easy-access storage that keeps your essentials handy.
2. Think Vertical
Your walls are untapped real estate! Pegboards like SKÅDIS keep supplies visible (and off your desk), while floating shelves and rails like KUNGSFORS are perfect for jars, baskets, or ribbon.
3. Balance Function and Style
Your space should work for you, but it should also make you excited to sit down and create. Consider neutral KALLAX shelves or add colorful DRÖNA boxes for personality. Trust me, you’ll love having a workspace that looks as good as it functions.
1. IKEA Pen Holders to Simplify Your Space
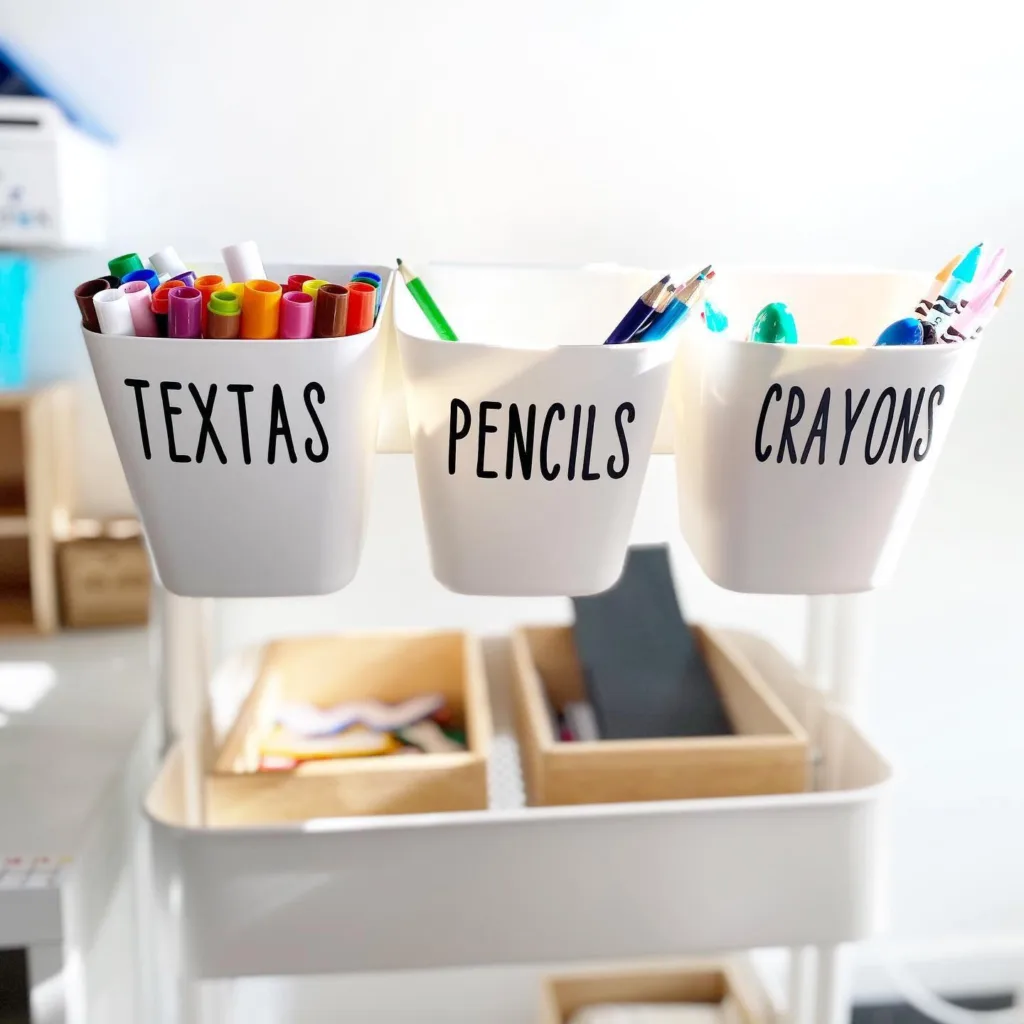
Do you know what’s worse than losing the exact pen you need? Spending ten minutes looking for it! Labeled pen holders, like these, make life so much simpler.
Throw your markers, crayons, and pencils into neatly labeled containers to stop the clutter for good. It’s especially handy during busy projects because everything stays in place.
If you’re short on surface space, mount them to a wall or cart. Stylish and practical—it’s a win-win.
2. Use Wall Storage to Free Up Desk Space
 Source: Pinterest
One of the smartest ways to keep your desk clutter-free is by using your walls. I love IKEA’s wall storage for this!
Adding pegboards, bins, and shelves creates a practical and visually appealing setup. Keep your most-used items within arm’s reach, and suddenly crafting feels effortless.
If you want to add personality, try color-coded bins or tiny labels. A touch of creativity can make your workspace truly yours.
Expert Tip: Stick to lightweight bins and shelves to avoid overloading the wall and ensure better durability.
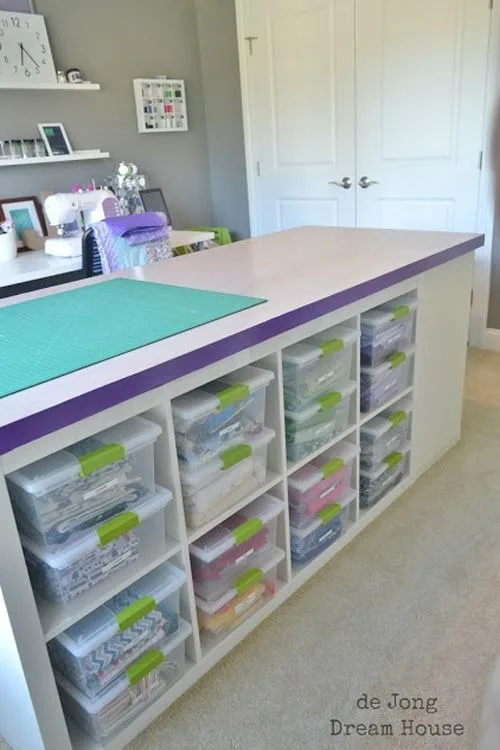
3. Get More Organized with Kallax Units
 Source: @frecklyfaced / Instagram
Want an organizer that’s as stylish as it is functional? Let me introduce you to IKEA’s Kallax units—my absolute favorite for craft room storage.
The square cubbies hold everything from paperwork to bulky bins, giving you a custom storage solution. I’ve used baskets and inserts to keep mine looking chic.
Mix in some personal decor like fairy lights or framed art to make it a feature piece in your room.
4. Color-Code Your Vinyl with IKEA Drawers
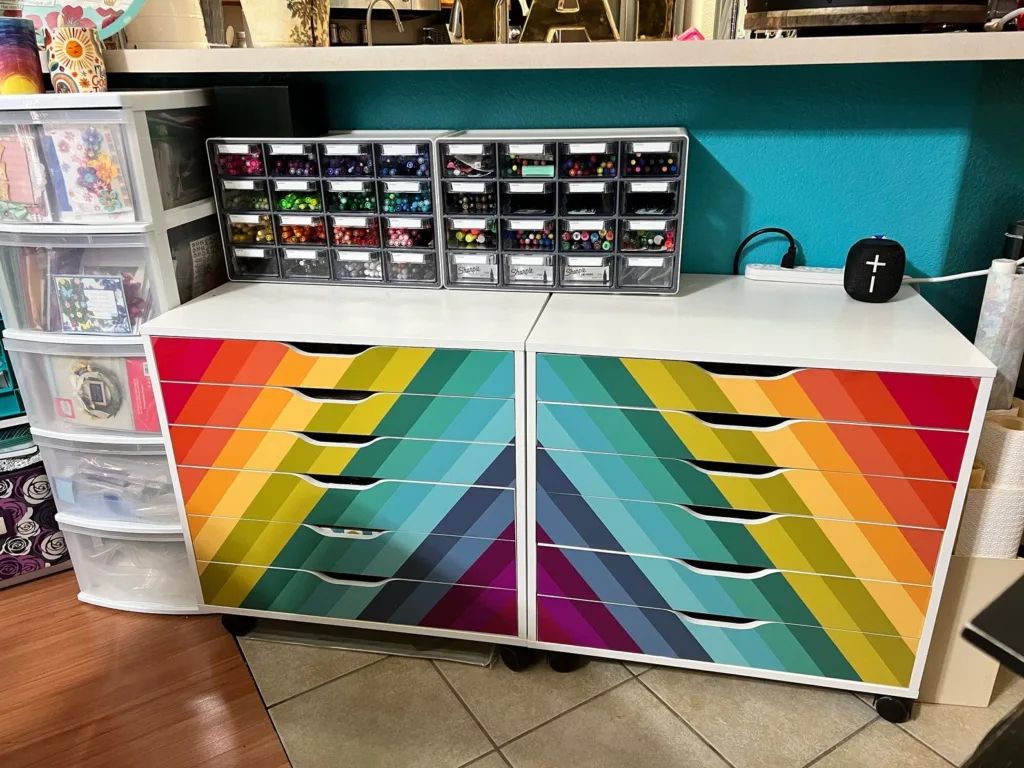 Source: etsy.com
If vinyl mess is taking over your craft room, color-coding them in IKEA drawers is life-changing. Just look at this rainbow of organization!
Each drawer can house different types of vinyl, so you’ll always know where to find what you need. The cheerful colors make it a joy to look at—even when you’re not crafting.
Organizing by material or project type takes this hack to the next level. You’ll never dig through loose rolls again!
Expert Tip: Line the bottom of each drawer with non-slip mats to keep vinyl rolls from shifting around.
5. Create Brush Storage Using IKEA Towel Hooks
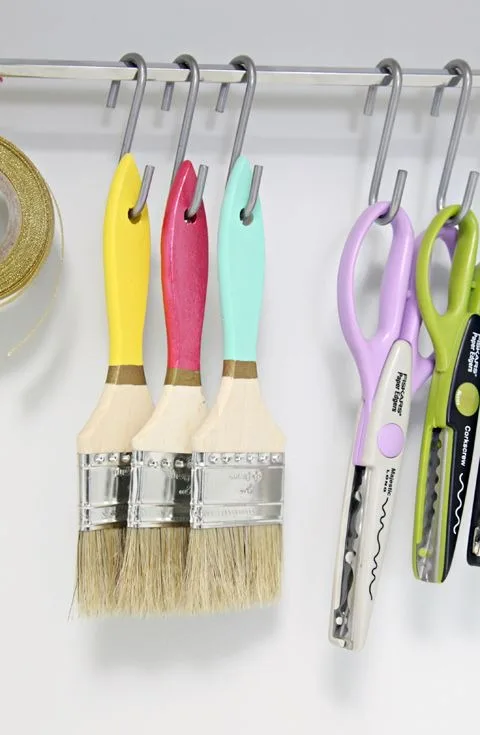 Source: iheartorganizing.com
Towel hooks aren’t just for bathrooms! Hanging your brushes and scissors on hooks above your desk makes them super easy to grab when you’re in the zone.
I’ve saved so much time not having to dig around for tools this way. Plus, keeping everything off your workspace frees up much-needed room for crafting.
Get creative by arranging the hooks at different heights to suit your needs, or even add ribbons for décor flair.
Expert Tip: Use adhesive hooks instead of screws for a damage-free setup, especially in rented spaces.
6. Design the Perfect Cricut Station
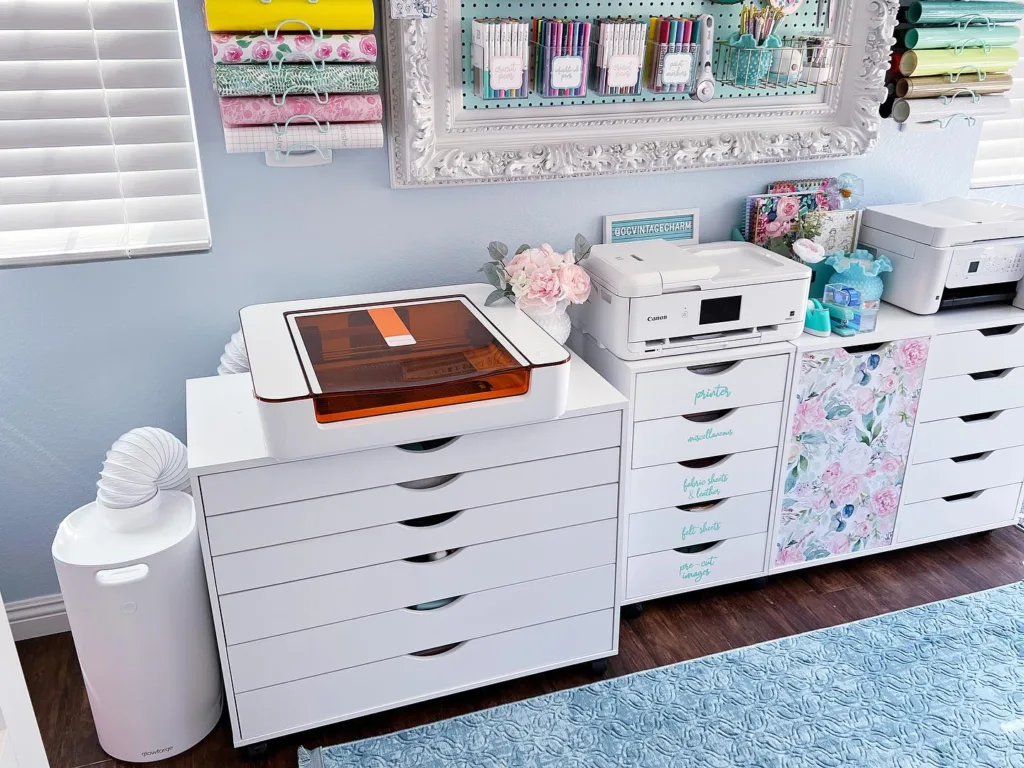 Source: @ocvintagecharm / Instagram
Cricut machines deserve their own special place—and IKEA units are ideal for creating a dedicated station. I set mine up with plenty of drawer storage underneath for mats, tools, and vinyl rolls.
Adding decals or pretty designs to the drawers makes the space feel exciting and personal. It’s a little treat every time you work there!
You’ll love having everything in one convenient spot—no more running back and forth mid-project.
7. Store the Small Stuff in Alex Drawers
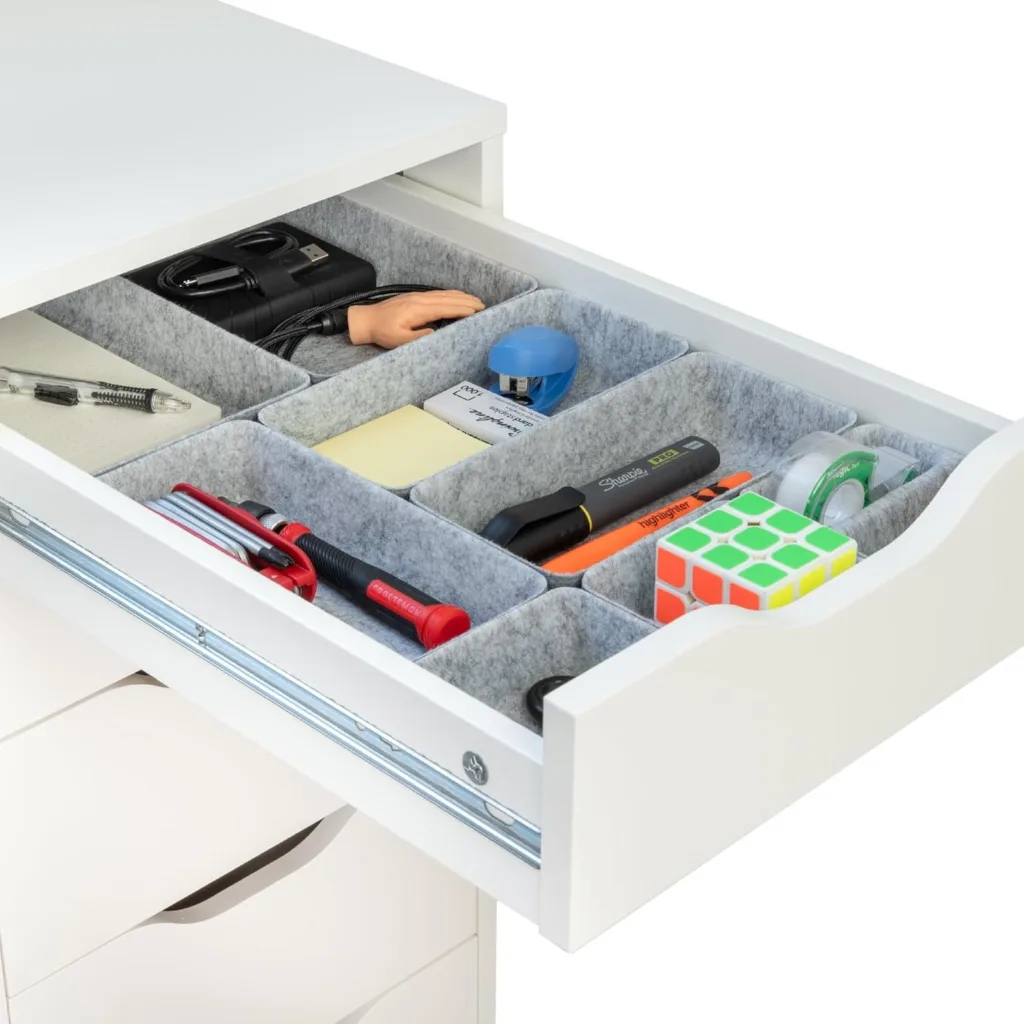 Source: Amazon
The best way to keep track of small supplies is by dividing them into Alex drawers. Trust me, these drawers are a game changer!
I use felt or plastic dividers to sort items like tape, glue, and tiny tools. It makes finding things a breeze, and the drawers slide open so smoothly.
For me, stacking these side by side keeps my space looking sleek and organized. They’re an absolute must in your craft setup.
8. Add IKEA Raskog Cart for Easy Access
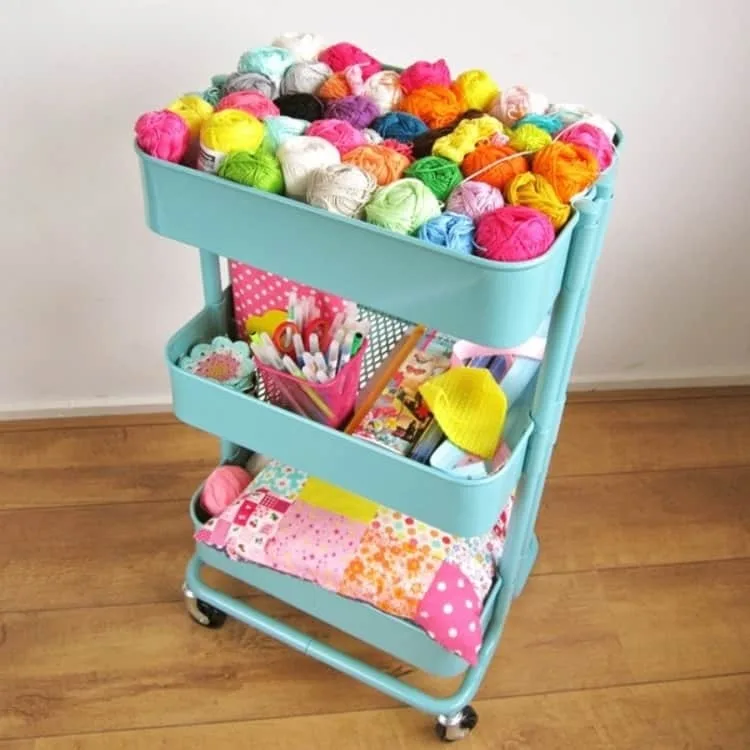 Source: onecrazyhouse.com
Here’s a fun tip: keep your current projects in a rolling Raskog cart! It’s portable, keeps essentials close, and looks adorable in any crafty setting.
I load mine with yarn or sketch pads, and it follows me wherever I need it. If you don’t want clutter, you can tuck it into a corner afterwards.
It’s also great for kids’ tools if they like crafting alongside you. Think of it as your mobile crafting station!
9. Hang Smaller Supplies with Skadis Containers
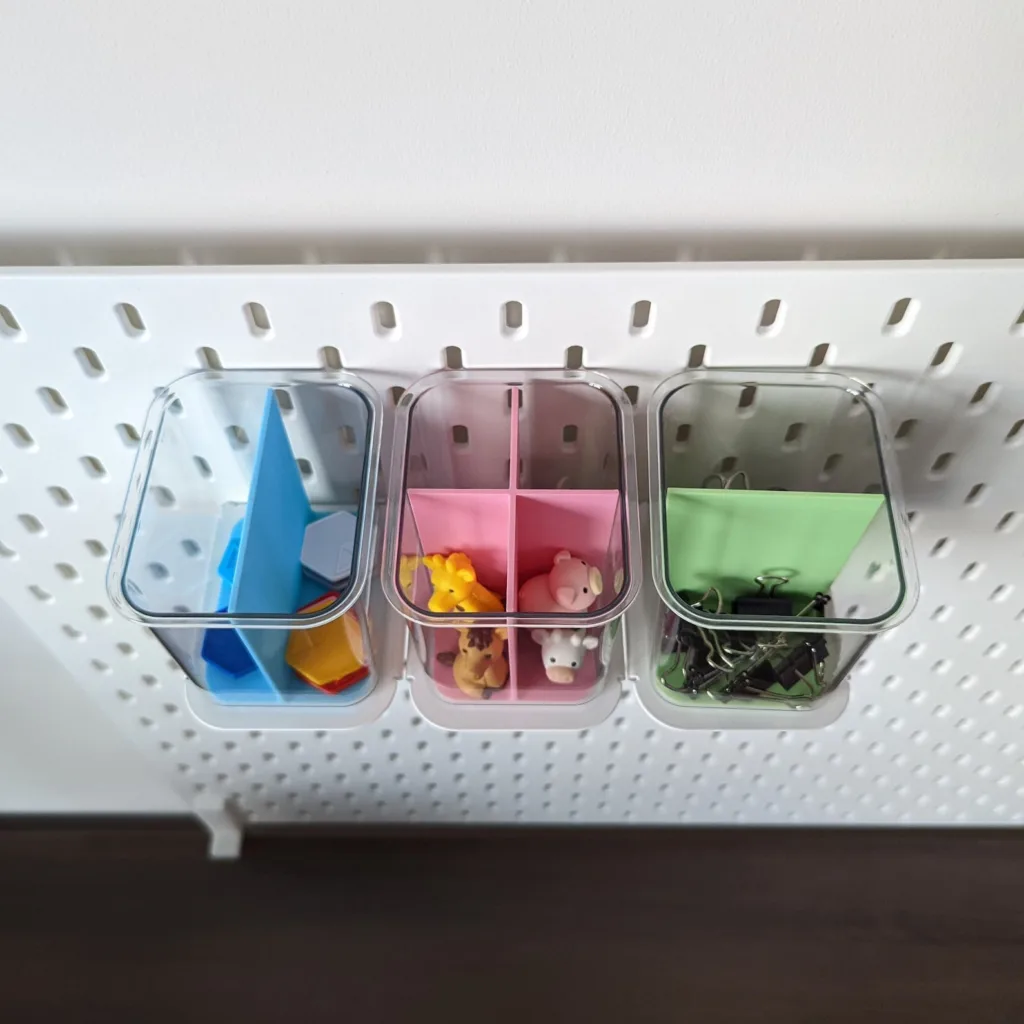 Source: etsy.com
Small supplies driving you crazy? Skadis containers might just be your new best friend. I use them for buttons, clips, and random knick-knacks that I don’t want to lose.
Clipping them onto a pegboard keeps them in clear view and off your workspace. I also love how customizable these are—add more containers anytime!
You can even use pastel dividers inside for some added style. It’s a great little hack without too much effort.
10. IKEA Peg Board
 Source: Amazon
Here’s a tip: use a pegboard to clear up your desk without hiding your tools. I hang scissors, ribbons, and even mini bags, so I can grab them without hunting around.
What’s great about this system is how flexible it is. You can move hooks and holders around to suit your needs—no tools required!
A pegboard transforms chaos into something practical and even cute. Trust me, once you have one, you’ll wonder how you ever lived without it.
Expert Tip: Use a mix of small and large hooks to hold tools of different sizes without taking up excessive space.
11. Use Bins to Keep Your Stamping Supplies Tidy
 Source: aliexpress.com
Stamps play hide-and-seek, don’t they? These bins make it easy to sort stamps, ink pads, and embossing powders.
Label each bin based on categories—trust me, this saves so much time when you’re mid-project. It’s neat, organized, and simple to maintain.
Bonus? The bins give your craft room a clean, streamlined feel, which totally helps your creative flow.
12. Turn Your IKEA Cabinet into a Mini Creative Hub
 Source: Town and Country Living
Who says an IKEA cabinet can’t be your craft sanctuary? Add baskets, jars, or containers to make it functional and gorgeous.
I love decorating the top shelf with inspirational items—personal touches can work wonders! It’s like crafting in your own little studio.
This simple hack transforms your space into a tidy haven where everything is easy to reach and visually inspirational.
Expert Tip: Line the cabinet shelves with patterned paper or fabric for a pop of personality and added durability.
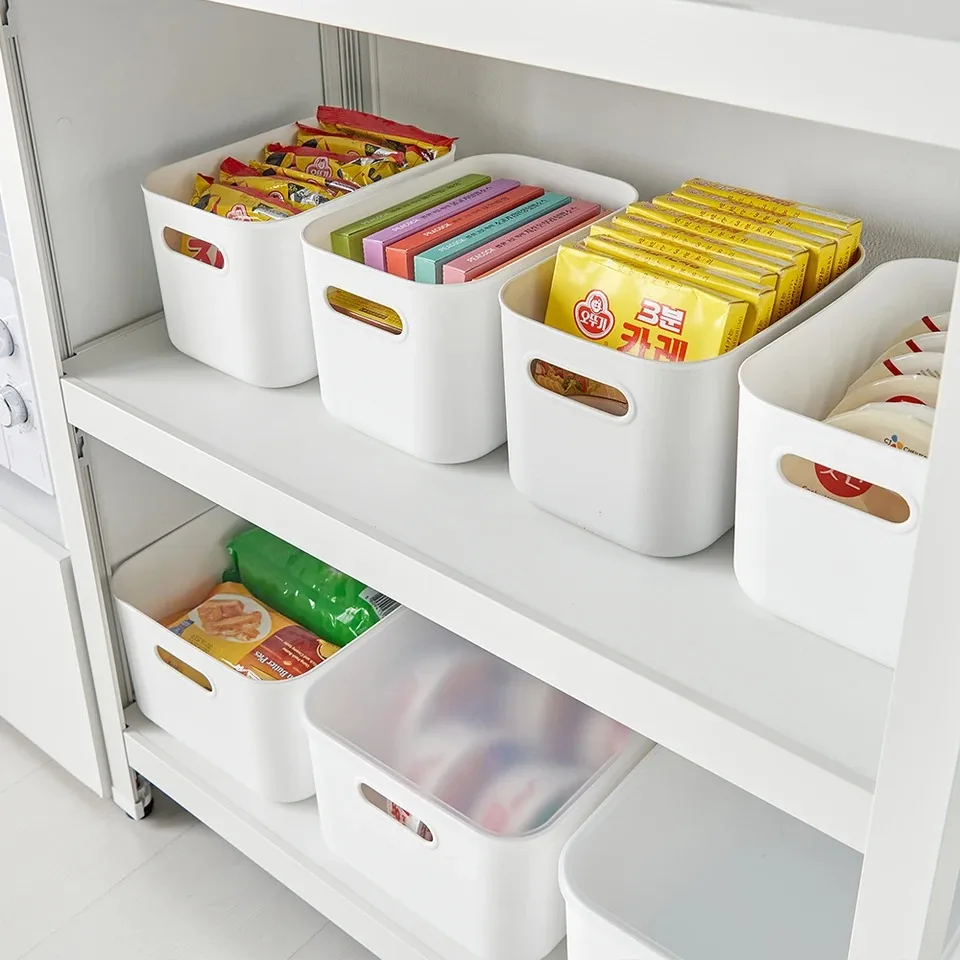
13. Organize Craft Items by Project Using Storage Bins
 Source: Pinterest
I’m a huge fan of sorting everything by project type, and these bins are perfect for the job! From fabric scraps to random beads, they hold all your essentials.
A quick tip: Use labels. You’ll thank yourself later, especially when you’re in the middle of a creative frenzy.
What I love most about these bins is they don’t just organize—they prevent the dreaded craft table explosion.
14. Display Your Brushes with a Clever Hanging System
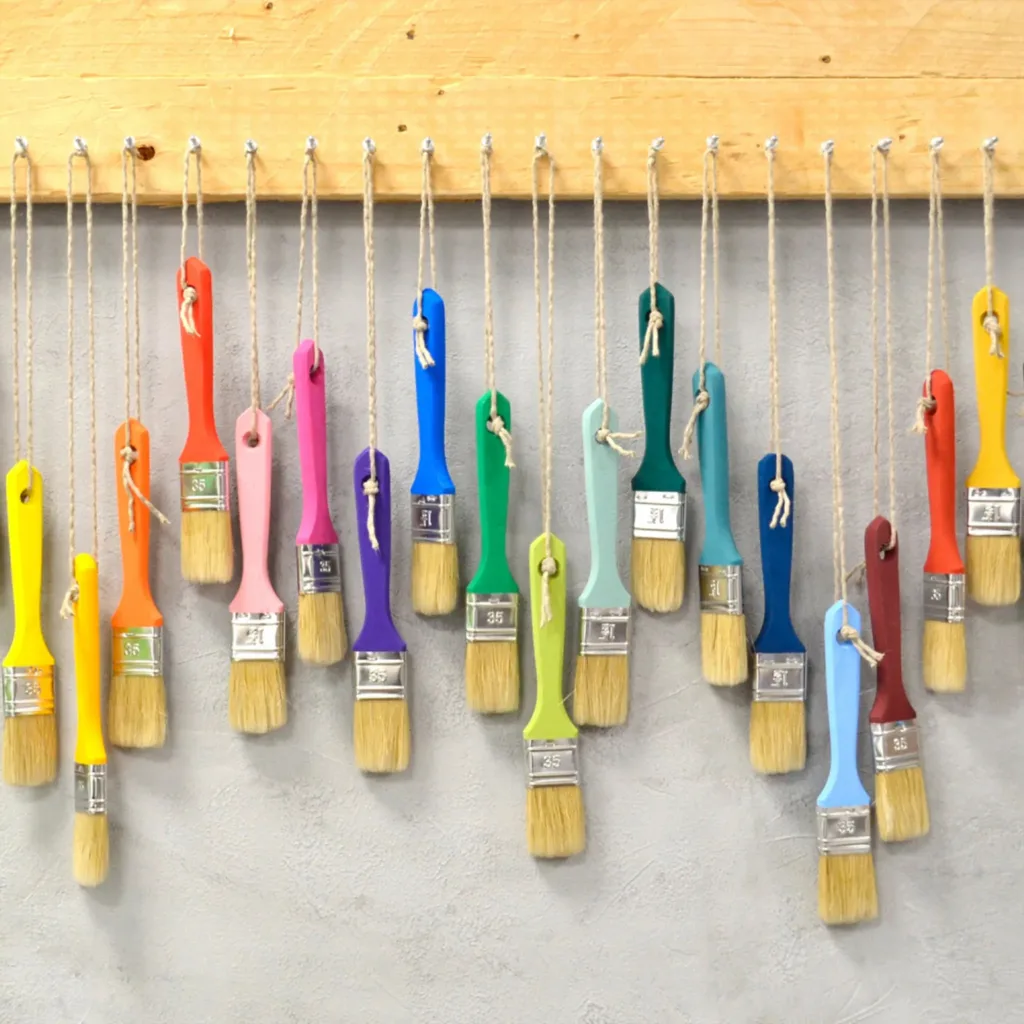
Paintbrushes deserve their own art display! Grab a wooden bar, some string, or hooks to hang them up by size or color.
Not only does this hack keep brushes untangled, but it’s also a great way to brighten your craft space with a pop of color.
Personally, I find it so satisfying to walk in and grab what I need without digging through drawers—I bet you’ll love it too.
Expert Tip: Have leftovers? Add space for small tools like scissors or rulers. Repurposing is always a win in crafting!
15. Keep Yarn Organized with a Billy Bookcase
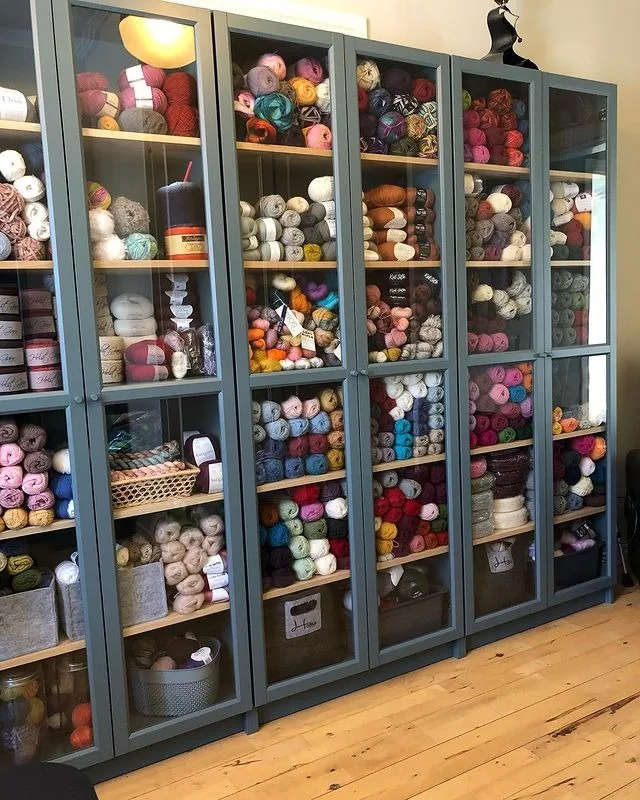 Source: @annmariahelena
The Billy bookcase isn’t just for books, folks! I use mine to showcase my yarn collection. The glass doors? Genius for keeping dust away.
Sorting yarn by color makes planning projects easy, plus it turns the bookcase into a visual centerpiece.
If you’re short on space, use the lower shelves for extra supplies—needles, hooks, whatever you need close by.
16. Repurpose a Dollhouse for Yarn Storage
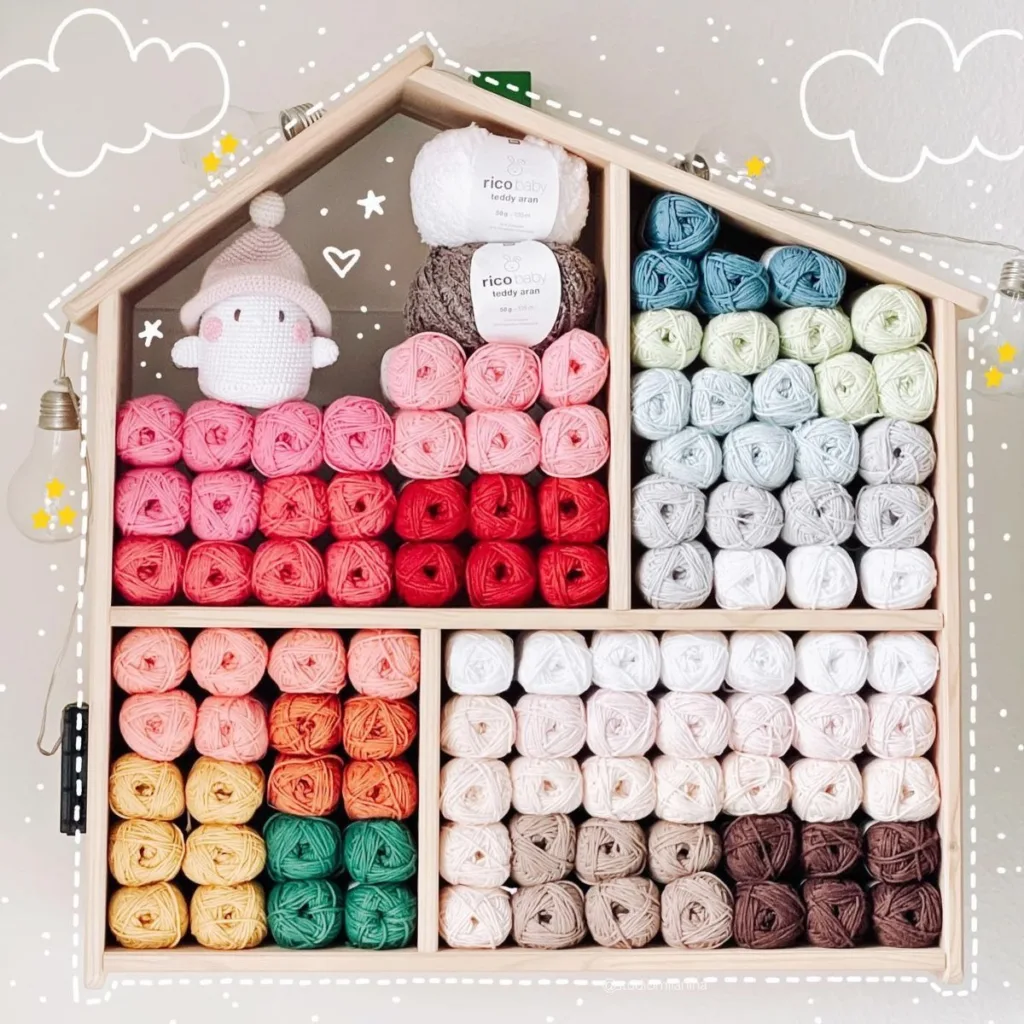 Source: @studiomilanina
Who would’ve thought a dollhouse could work as yarn storage? Each “room” becomes a perfect space for organizing yarn by color or type.
I customized one for a friend, adding little labels and some fun decor elements. It’s such a playful, creative solution!
This hack is functional but also doubles as an adorable addition to your craft room. You’ll smile every time you see it.
17. Combine Shelves to Create a Versatile System
 Source: NX2
Instead of sticking to one shelf style, try combining different types for maximum flexibility. Open bins mixed with exposed shelves? Perfection!
I like to sort supplies like fabric, paints, and tools by category, but keep frequently used items easy to grab.
Using the top shelves for special decor or rarely needed tools keeps everything from looking cluttered. Smart and stylish!
Expert Tip: Add adjustable shelving to keep up with changes in your crafting needs—crafting evolves, and so should your setup!
18. Add a Fun Pop of Color with Woven Baskets
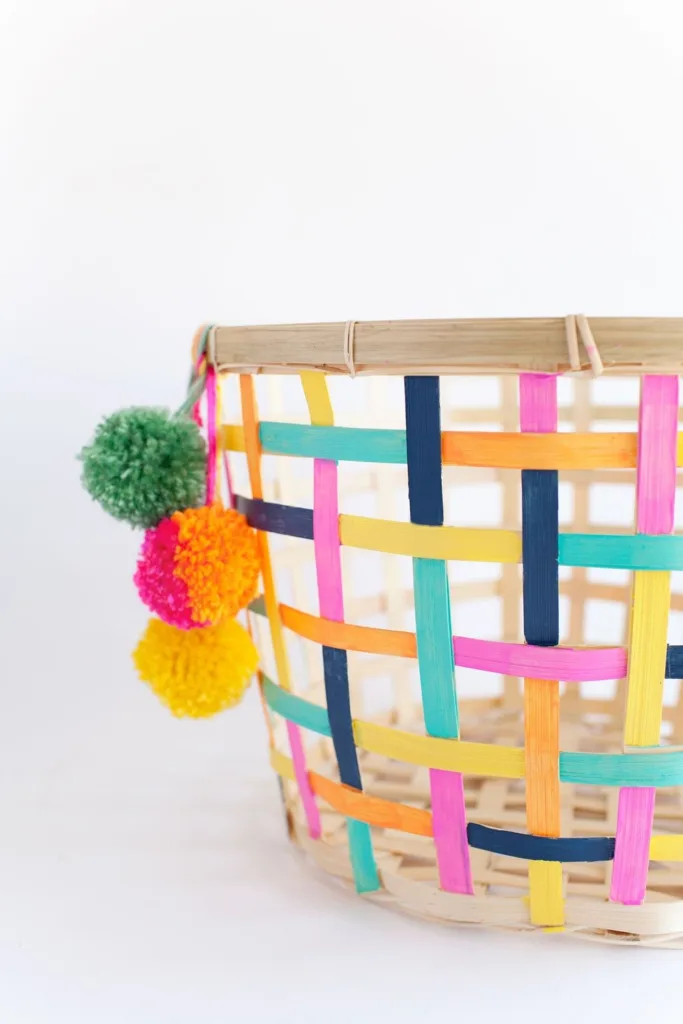 Source: Tell Love and Party
Don’t underestimate the power of a cheerful storage basket. I use mine for fabric scraps, and it’s light enough to move when I need it.
Look for ones with fun colors or patterns—they brighten up your craft room while keeping supplies tidy.
Here’s a tip: Assign each basket to different material types or projects. It’s an easy way to stay organized in style!
Conclusion
Crafting can get messy, but organizing doesn’t have to be boring! These IKEA hacks blend practicality and charm, giving your craft room a polished, inspiring vibe.
I’ve used many of these tips myself, and they truly make a difference. Pick a couple to try out—you’ll be amazed at how much smoother your creative process becomes.